WhatsApp, SMS, & Push Marketing (SPM) - Popup Opt In Creation and Configuration •
We’ve recently updated the Opt-In configuration for the WhatsApp, SMS & Push app. After activating the marketing channel you’d like to support, you can enable your Opt-In Popup for subscriber collection. This guide will walk you through the steps to easily create and customize your new Opt-In Popup.
On this page:
Create a Popup Opt In
-
Go to the Subscriber Collection page from either the sidebar menu or the app dashboard, then click Create.

2. Select the Popup Template option by clicking on it. Then, you can begin configuring the options for the new popup.

General Popup Settings
1. Enter a desired name for your opt-in popup.

2. Choose how you want to collect subscribers. Here you can see the following options. If two options are selected, one of these is prioritized over the other.

- Phone number subscribers can be used for SMS and/or WhatsApp marketing.
3. Choose when to show the popup opt-in:

- Time Delay: Displays the popup after a specified amount of time.
- Cart Value: Displays the popup once a certain value is added to the cart.
4. Choose whether you want to send a welcome message when a subscriber signs up.

5. Choose whether a floating button should appear when a customer closes the popup, allowing them to reopen it if needed.

Specific Popup Configuration Options
Note
The following configuration example is based on the Subscriber Type: Webpush and Phone number subscribers (Webpush priority).
First Tab: Primary Popup Customization
This tab allows you to customize the primary popup that customers will see. The Webpush channel is prioritized in this case. You can configure settings on the left side of the screen and preview the popup on the right, in desktop or mobile view, before creating it or moving to the next tab.

- Use Custom Push Popup: Choose this option to provide additional context for website visitors about becoming a subscriber. You can select between a custom popup and the default browser popup, or choose to display the default browser popup only.
- Enable Web push Widget on iOS: Select whether to enable the popup on iOS devices.
- Title: The title of the popup that will appear to visitors.
- Description: The description text for the popup, offering more details or context about the subscription.
- Button Text: Customize the button text displayed on the popup (e.g., "Subscribe Now").
- Font Customization: You can also customize the font color, size, and style to suit your website's design.

- Icon & Image: You have the option to include an icon in the popup for additional visual appeal. You can also upload an image to the popup and position it as desired, either on the left, right, top, or as the background of the popup.

Second Tab: Secondary Popup Customization
This tab offers customization options and a preview for the secondary popup in desktop or mobile. It offers the same customization features as the first tab, but with the added option to enable both the SMS and WhatsApp channels for phone numbers subscriber, or select only one of the two.

Third Tab: Success
This tab allows you to customize the message that subscribers receive after signing up for each marketing channel, WhatsApp, SMS, and Web Push. It offers the same customization features as the previous tabs. You can tailor the message for each channel and preview the message as it will appear to subscribers.

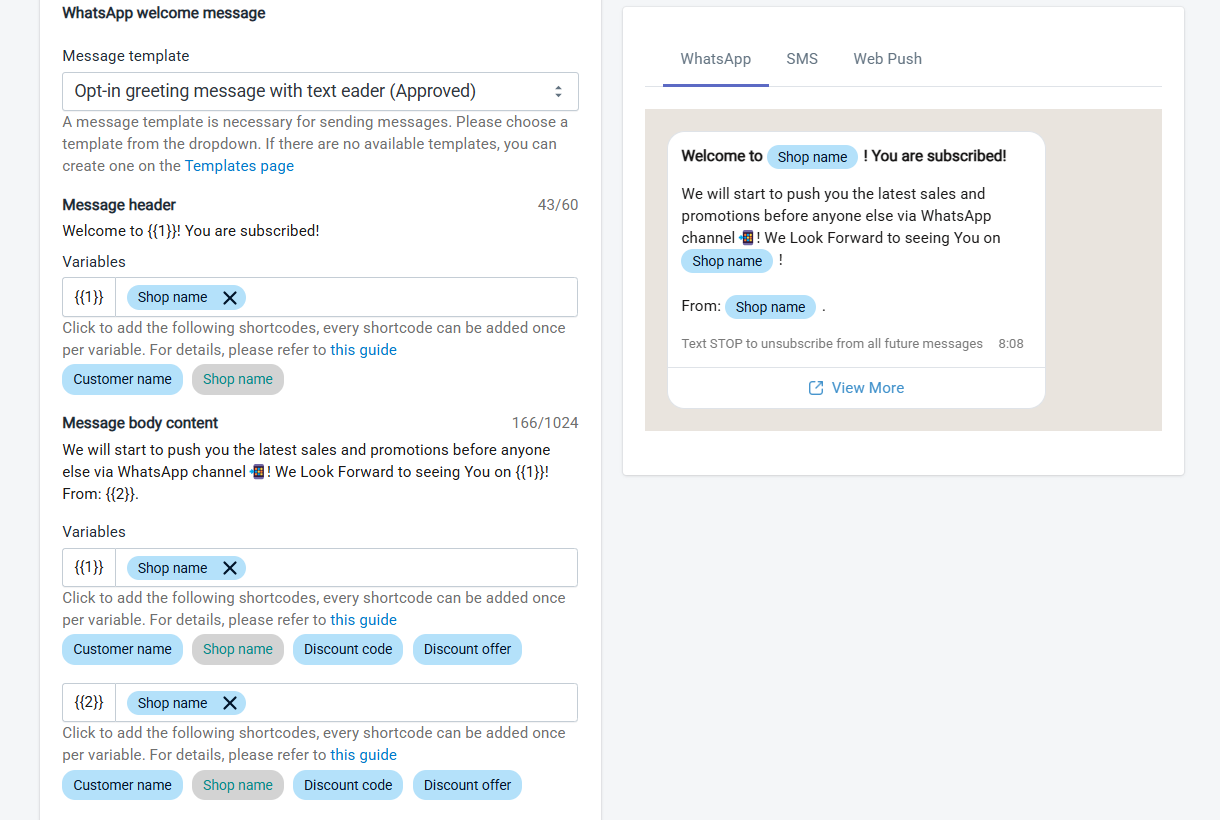
Fourth Tab: Post-Signup Message Customization
This tab allows you to customize the message that subscribers receive after signing up for each marketing channel, WhatsApp, SMS, and Web Push. You can tailor the message for each channel and preview the message how it will appear to your subscribers.
You can also include a Discount Code or Unique Discount Offer in the greeting message to encourage customer engagement.

Discount Code: The discount code must first be created in the Shopify Admin > Discounts section. Once created, simply copy and paste the code into the Discount Code field. For instructions on setting up a discount code, refer to the Shopify Discounts article.
Unique Discount Offer: This feature is available on the Professional plan and requires the app to have permission to manage discounts. When enabled, it generates a unique, one-time-use discount code for each subscriber, helping prevent code abuse.
Message Configuration for Each Channel
WhatsApp Welcome Message:
SMS Welcome Message:

Web Push Welcome Message:

Final Tab: Floating Button Customization
If you have enabled the Floating Button, this tab provides customization options for the button's appearance and behavior.

- Padding: Customize the horizontal and vertical padding to adjust the button's spacing.
- Font Style, Size, and Color: Choose the font style, size, and color to match your design preferences.
- Button Icon: Select an icon for the floating button to enhance its visual appeal.
- Animation: Choose an animation for the floating button to make it more interactive.
- Close Button: Customize the appearance and behavior of the close button.
Once you have finished customizing your Opt-In Pop, click the Create button at the bottom of any tab.

Tip
The Floating button can also be enabled on its own. While it has its own configuration, it follows the same setup structure as the Opt-In Popup, making it easy to manage either option based on your preference.

Note
If you create multiple Opt-In Popups, only one Popup can be active at a time.
We also provide a brief video tutorial for the Popup Opt-In Creation and Configuration:
If you have any questions or concerns, please reach us out at help@hextom.com